The gimbal, I don't believe it ... it ruins the first choice ...
Good with all that, I have not advanced ...
machine drum washing impeller
-
Christophe
- Moderator

- posts: 79332
- Registration: 10/02/03, 14:06
- Location: Greenhouse planet
- x 11046
-
Grelinette

- Econologue expert

- posts: 2007
- Registration: 27/08/08, 15:42
- Location: Provence
- x 272
I am surprised to see the regularity of the water jet when there is only one piston which works only in one direction!
That said there are some interesting ideas in the videos.
That said there are some interesting ideas in the videos.
0 x
Project of the horse-drawn-hybrid - The project econology
"The search for progress does not exclude the love of tradition"
"The search for progress does not exclude the love of tradition"
-
Christophe
- Moderator
- posts: 79332
- Registration: 10/02/03, 14:06
- Location: Greenhouse planet
- x 11046
News of the day: I have advanced mating (if we applaud loudly!)
I found a "seamless" method without "touching" the shaft of the Tigrou alternator to couple a complete rear sprocket (6 sprockets therefore = adjustable possible).
The method with 100% "salvage" parts includes tightening (obviously) but also axis / pinion coaxiality (it was the "hardest" to find). I'll take pictures when it's over ... if it works
On the other hand, the smallest sprocket is 16 teeth, so I could not use an original crown (I need a ratio of 10 or so), so I will use the "Flytox method" mentioned above!
The top would be "radial slides" in order to have a "variable" diameter (finally "adjustable") ....
0 x
Do a image search or an text search - Netiquette of forum
-
tigrou_838

- I posted 500 messages!

- posts: 573
- Registration: 20/10/04, 11:25
- Location: Lorraine border luxembourg
-
Christophe
- Moderator
- posts: 79332
- Registration: 10/02/03, 14:06
- Location: Greenhouse planet
- x 11046
Wait Tigger it was for laughs! You will applaud when the first watts come out I will applaud in 6 months after several big summer storms ...
Ay, I finished thecoupling on the alternator side, I still had to lime a little.
It is 100% recovered and without welding and the icing on the cake: I kept the freewheel, if the generator "blocks" (overspeed in the event of a flood, for example) the paddle wheel is not stopped. It is a significant security I think!
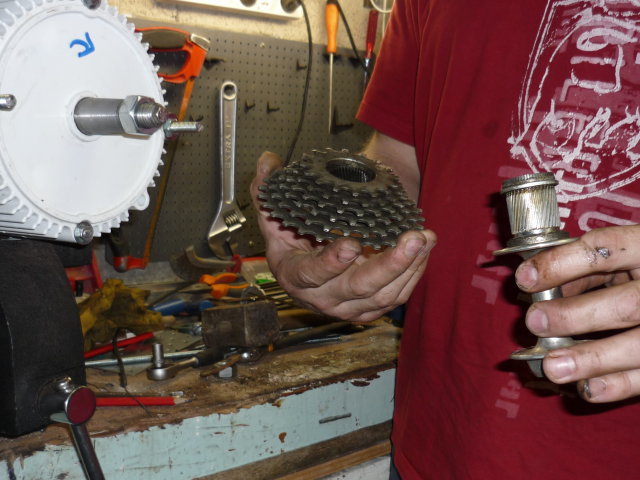
A) The pinion removed.
The transmission of "power" is done by a helical "coupling", it is the 1st time in my life that I dismantle a bicycle sprocket medium so I have no idea if it is a common technique, universal or rare...
B) 1st attempt last night:
- centering by a 22mm to 3/4 solder brass fitting (which presses on the cone for centering) and tightening with a bolt entering "into" the hub and thus transmitting the torque.


The coaxiality was not bad and the transmissible torque important but I gave up the idea because I think that the reliability of the transmission is insufficient: the helical gear would have ended up being "machined by the bolt".
B) 2nd attempt (the good one I hope) this morning after a night of reflection.
As the diameters were compatible, I reused the helical part (aluminum) of the original means, this part has an internal cone which rests on the cone of the alternator (the slopes are different but I think that is enough to transmit the torque given the tightening torque exerted by the bolt).
The assembly is very simple:

We thread the helical aluminum piece cut and filed as it should

We thread the gables:

We put the main nut:

We tighten and put a last safety nut (6mm) + washer in the hub:
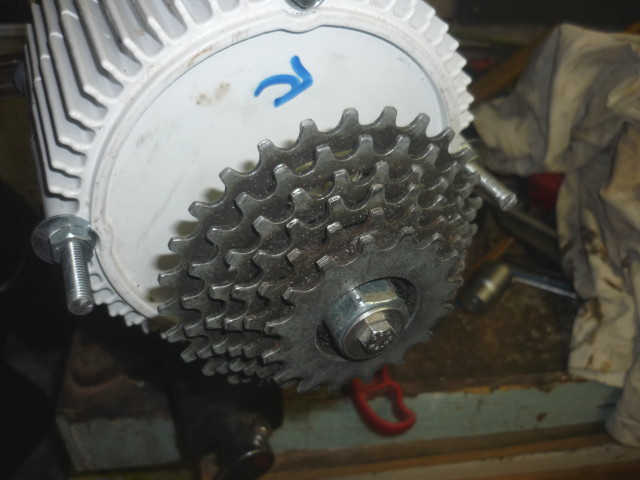
The coaxiality is "perfect to the eye" (and for the recovery).
I forgot the stop in axial translation is done with the original annular nut of the pinion:

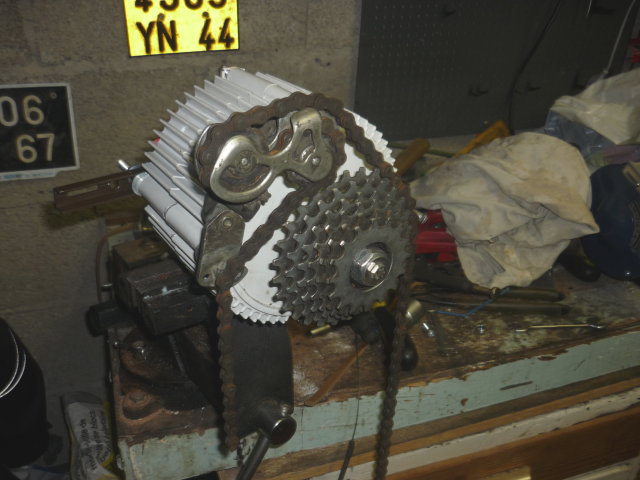
Cado Bonux: the 1st derailleur positioning tests (mandatory if I want to change the pinion and in + it will make the chain tension without having to rotate the entire alternator):
I now attack the "crown" with variable diameter (I think a good idea for the realization, evolution of the idea of Flytox above).
Question for cycling pros: what is the rule in terms of crown-pinion alignment?
ps: Tigger sorry I tagged on your alternator and I scratched the cone a little for the tightening loosening ...
Ay, I finished thecoupling on the alternator side, I still had to lime a little.
It is 100% recovered and without welding and the icing on the cake: I kept the freewheel, if the generator "blocks" (overspeed in the event of a flood, for example) the paddle wheel is not stopped. It is a significant security I think!
A) The pinion removed.
The transmission of "power" is done by a helical "coupling", it is the 1st time in my life that I dismantle a bicycle sprocket medium so I have no idea if it is a common technique, universal or rare...
B) 1st attempt last night:
- centering by a 22mm to 3/4 solder brass fitting (which presses on the cone for centering) and tightening with a bolt entering "into" the hub and thus transmitting the torque.
The coaxiality was not bad and the transmissible torque important but I gave up the idea because I think that the reliability of the transmission is insufficient: the helical gear would have ended up being "machined by the bolt".
B) 2nd attempt (the good one I hope) this morning after a night of reflection.
As the diameters were compatible, I reused the helical part (aluminum) of the original means, this part has an internal cone which rests on the cone of the alternator (the slopes are different but I think that is enough to transmit the torque given the tightening torque exerted by the bolt).
The assembly is very simple:
We thread the helical aluminum piece cut and filed as it should
We thread the gables:
We put the main nut:
We tighten and put a last safety nut (6mm) + washer in the hub:
The coaxiality is "perfect to the eye" (and for the recovery).
I forgot the stop in axial translation is done with the original annular nut of the pinion:
Cado Bonux: the 1st derailleur positioning tests (mandatory if I want to change the pinion and in + it will make the chain tension without having to rotate the entire alternator):
I now attack the "crown" with variable diameter (I think a good idea for the realization, evolution of the idea of Flytox above).
Question for cycling pros: what is the rule in terms of crown-pinion alignment?
ps: Tigger sorry I tagged on your alternator and I scratched the cone a little for the tightening loosening ...
Last edited by Christophe the 22 / 04 / 09, 15: 18, 1 edited once.
0 x
Do a image search or an text search - Netiquette of forum
-
Christophe
- Moderator
- posts: 79332
- Registration: 10/02/03, 14:06
- Location: Greenhouse planet
- x 11046
For those who have not followed the subject in its entirety, I put forward the idea of Flytox that I will carry out immediately (but in variable spacing by putting the cut parts in the tray on ... bolt slides! ):
Flytox wrote:Bonjour Christophe
For your transmission. I think we can do with a single stage of multiplication provided you make a very large training crown against your drum.
The trick, you get a rear moped crown (for scrap) and you cut it according to the crobar below to keep only 4 or 5 pairs of teeth:
You make a circular track which keeps the chain on a large diameter, a bit like you would have done for a belt drive, in riveted sheet metal, plastic wood, whatever you want.
In this track you make 4 holes in which the crown ends of two consecutive teeth protrude to ensure training. You fix, bolt or soda ... depending on the support you can.
I saw a farmer who had cobbled together a mixing machine with a system like that. When the chain begins to wear out (after many hours of operation, you have to sharpen the "attack" tooth to be sure that it will fit into the chain in the right place, the second doing the training.
A+


0 x
Do a image search or an text search - Netiquette of forum
-
Christophe
- Moderator
- posts: 79332
- Registration: 10/02/03, 14:06
- Location: Greenhouse planet
- x 11046
Here is my future crown 

Well, it will probably not turn out tomorrow: I took 1 hour 30 minutes to reverse engineer the rest of the bike and dismantle this damn biiiiiiiiip from its bottom pedal biiiiiiiiiiiiip !!!

Impossible to take out the pedals (however I stuck, it was hot mounted or what ????), and side pedal, the pedal is set on the pedal, in short impossible to disassemble properly without taking out the grinder ...
It was (still) made in France ... we can say that it was solid at this level at least ... I tried to cut the axis with the hacksaw: impossible, surely a treatment surface or case hardened steel?
Result of this "pig" work:


ps: how to check with certainty if 1 chain is "compatible" with a crown pinion? Because I will "use" 2 chains with 1 crown and 1 sprocket which come from different bikes ...
Well, it will probably not turn out tomorrow: I took 1 hour 30 minutes to reverse engineer the rest of the bike and dismantle this damn biiiiiiiiip from its bottom pedal biiiiiiiiiiiiip !!!
Impossible to take out the pedals (however I stuck, it was hot mounted or what ????), and side pedal, the pedal is set on the pedal, in short impossible to disassemble properly without taking out the grinder ...
It was (still) made in France ... we can say that it was solid at this level at least ... I tried to cut the axis with the hacksaw: impossible, surely a treatment surface or case hardened steel?
Result of this "pig" work:
ps: how to check with certainty if 1 chain is "compatible" with a crown pinion? Because I will "use" 2 chains with 1 crown and 1 sprocket which come from different bikes ...
0 x
Do a image search or an text search - Netiquette of forum
-
the boulle
- I posted 500 messages!
- posts: 519
- Registration: 02/12/08, 20:44
- x 12
-
Christophe
- Moderator
- posts: 79332
- Registration: 10/02/03, 14:06
- Location: Greenhouse planet
- x 11046
Ok so it will be fine 2 quick links and off you go !!
But the pinion and crowns that I have have a completely different "size" all the same!
ps: the "cordially" is not too much for forums nice like ours
But the pinion and crowns that I have have a completely different "size" all the same!
ps: the "cordially" is not too much for forums nice like ours
0 x
Do a image search or an text search - Netiquette of forum

Bonjour Christophe
Your pedals, it will not be a thread not to the left by chance ????
It has to be standard, every time I mix bikes, it works. In any case, if you keep only 2 consecutive teeth on the drum side, it will still work.
A+
Christophe wrote:
Well, it will probably not turn out tomorrow: I took 1 hour 30 minutes to reverse engineer the rest of the bike and dismantle this damn biiiiiiiiip from its bottom pedal biiiiiiiiiiiiip !!!
Impossible to take out the pedals (however I stuck, it was hot mounted or what ????)
Your pedals, it will not be a thread not to the left by chance ????
ps: how to check with certainty if 1 chain is "compatible" with a crown pinion? Because I will "use" 2 chains with 1 crown and 1 sprocket which come from different bikes ...
It has to be standard, every time I mix bikes, it works. In any case, if you keep only 2 consecutive teeth on the drum side, it will still work.
A+
0 x
Reason is the madness of the strongest. The reason for the less strong it is madness.
[Eugène Ionesco]
http://www.editions-harmattan.fr/index. ... te&no=4132
[Eugène Ionesco]
http://www.editions-harmattan.fr/index. ... te&no=4132
Back to "hydraulic, wind, geothermal, marine energy, biogas ..."
Who is online ?
Users browsing this forum : No registered users and 246 guests